Edit/View Project Contact - Guest User Types - Company and Contact
![]() Updated
Updated
Suggested Prior Reading
Edit/View Project Contact - Guest User Types
Contact Details
The following are the general fields for the Company and the Contact on the Edit/View Project Contact for Guest User Types.
The Name is listed as well as a description of the field. Below the name will be an indicator whether it is a Company Field or a Contact field (as both are listed on this form)
Some fields can be turned on or off to display by the Administrator, so not all fields may appear for all organizations.
Name | Description |
Company Name (Company) | The name of the Company. |
Type (Contact) | The Type of the Contact. This is a Guest User Type. Guest User Types are defined by System Administrators. Default Notifications and Permissions are defined for each Guest User Type and this contact inherits those by default for this project but they can be over-ridden. See Project Contact - Permissions and Project Contact - Notifications. If the Guest User Type permissions or notification are over-ridden, they will stay with those over-ridden settings even if the User Type is subsequently changed.
The selected item will display in the drop down field in black writing. If the drop down field is in grey writing it indicates there is no option selected. 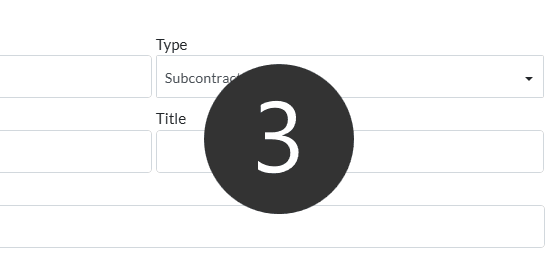 |
Contact Name (Contact) | The name of the Contact. This is a required field. This is for both the first and last name of the Contact and should be entered First Name first, then last name. |
Title (Contact) | Enter the title for the Contact. This is optional. |
Address 1 (Contact) | Enter the address for the Contact. This is optional. |
Address 2 (Contact) | Enter a second address for the Contact if required. This is optional. I |
City (Contact) | Enter the City for the Contact. This is optional. |
State (Contact) | Enter the State or Province for the Contact. This is optional. |
Postal Code (Contact) | Enter the postal code for the Contact. This is optional. If this Contact is copied to a new one using the Copy Contact function, this field will be copied. |
Country (Contact) | Enter the Country for the Contact. This is optional. If this Contact is copied to a new one using the Copy Contact function, this field will be copied. |
Phone (Contact) | Enter the land line phone number for the Contact or the company main phone number. This is optional. If this Contact is copied to a new one using the Copy Contact function, this field will be copied. |
Extension (Contact) | Enter the extension for the Contact. This is optional. |
Cell (Contact) | Enter the cell for the Contact. This is optional. If this Contact is copied to a new one using the Copy Contact function, this field will be copied. |
Fax (Contact) | Enter the fax for the Contact. This is optional. If this Contact is copied to a new one using the Copy Contact function, this field will be copied. |
(Contact) | The email for the Contact. This is a required field. |
Selection Status (Contact) | In various functions in the system to do with Contacts, there are options to select all Contacts (such as on the Contacts List when doing functions like sending a request for all contacts to update their contact information). This option is used to turn on or off, whether the Contact is included in the select all option. If its ON, then the contact will be automatically selected in a select all contacts function (but the contact can still be individually deselected). If its OFF, then the contact will not be included in the select all contacts function (but the contact can still be individually selected). |
Labor Status / Union Status (Company) | This is a field with a preset list of system values to choose from (i.e. the list can not be changed). Multiple options can be chosen in this list. The options are:
Note* On the Company Edit form, this field is called Labor Status. On lists, this column is called Union Status.
The selected items will display in the drop down field in black writing. If the drop down field is in grey writing it indicates there is no options selected. 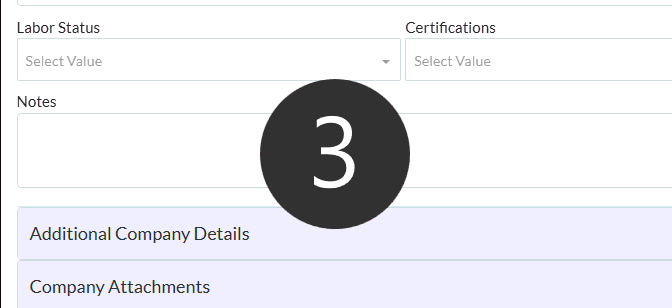 |
Certifications (Company) | This is a field with a preset list of system values to choose from (i.e. they can not be changed). Multiple options can be chosen in this list.
The selected items will display in the drop down field in black writing. If the drop down field is in grey writing it indicates there is no options selected. |
Sector (Company) | This is a field with a preset list of system values to choose from (i.e. they can not be changed). Multiple options can be chosen in this list.
The selected items will display in the drop down field in black writing. If the drop down field is in grey writing it indicates there is no options selected. 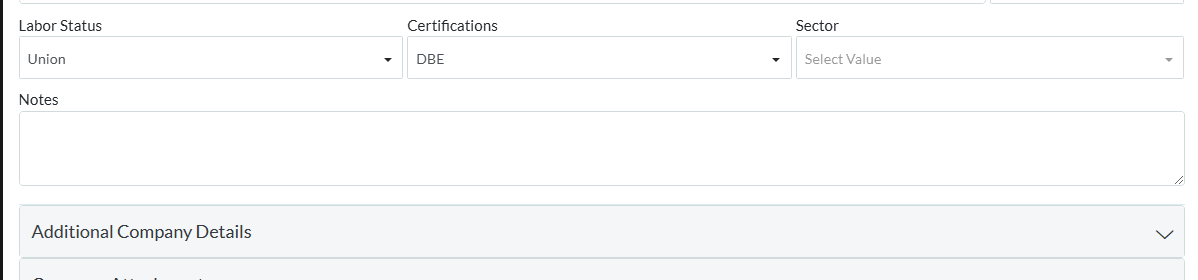 |
Notes (Contact) | Notes for the Contact. Enter as required. |