Inspections - Add/Edit/View - Status
![]() Updated
Updated
Suggested Prior Reading
Status Overview
Inspections can be managed in JobPlanner as part of the Field Tools functionality.
The Inspection status is used to manage the Inspection process. The following are the topics in this help.
- Inspection Statuses and General Inspection Steps
- Change the Status
Inspection Status
In JobPlanner, three statuses can be assigned:
- Open
- Submitted
- Closed
The following are general steps in the Inspection process along with the Statuses assigned for those Steps. These are general only and each Organization may have different inspection processes.
Open
This status usually encompasses:
- Creation of the Inspection
- Assignment of the Inspection
- Setting up the Distribution List
- Performing the Inspection and recording the outcomes of the inspection
While performing the Inspection and recording the outcomes of the Inspection, the progress can be tracked separately (i.e. what Inspection Items have outcomes recorded and which don't).
Inspections are fully editable while in the Open status, all the information can continue to be updated and entered or changed.
In addition, if an inspection failed, remediation actions including schedule, and budget updates may need to be made and additional inspections may be scheduled.
Submitted
This status encompasses:
- Submitting the Inspection and distributing
Once an Inspection is submitted, none of the information is editable. Being in a Submitted status locks the Inspection as no other changes should occur to the Inspection information.
The Inspection can be changed back to Open and changes made if necessary.
Closed
This status encompasses:
- Closing the Inspection.
Once an Inspection is Closed, none of the information is editable. Being in a Closed status locks the Inspection and any remediation actions should be conducted under another separate Inspection.
The Inspection can be changed back to Open and changes made if necessary.
Change the Status
- To change the Inspection Status, click in the Status drop down (below the title and above General Information).
- Select the Status
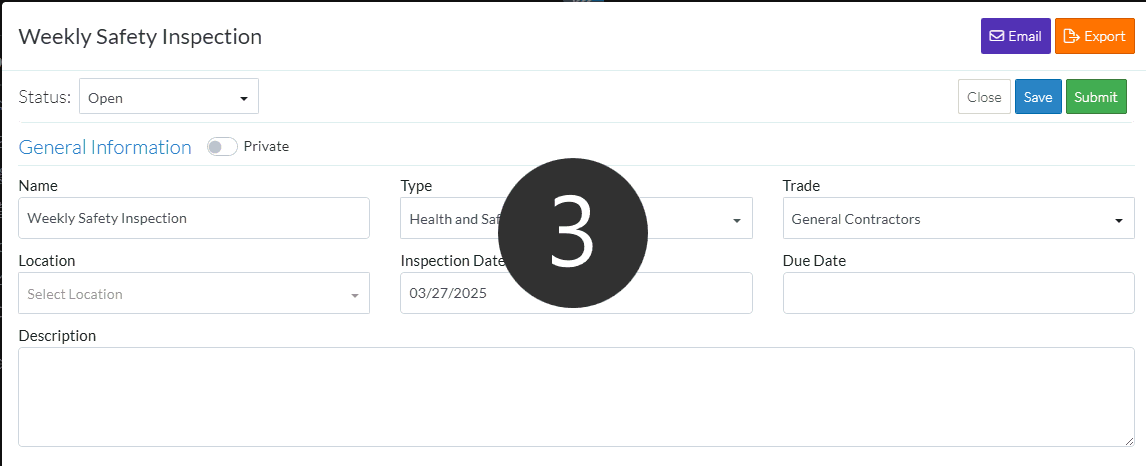
- Add, Edit or View additional information on the Inspection, see More Information below.
OR
Click the Save button when all the changes have been made.
OR
Click the Close button to not make the changes.
OR
If editing an Inspection, the Inspection can be deleted directly from this form, click the Delete button.
More Information
For more information on the General Information, see Inspections - Add/Edit/View - General Information.
For more information on the People, see Inspections - Add/Edit/View - People.
For more information on Attachments, see Inspections - Add/Edit/View - Attachments.
For more information on the Inspection Items, see Inspections - Add/Edit/View - Inspection Items.
Next Steps
To email the Inspection along with a PDF of the Inspection as an attachment, see Inspections - View/Edit - Email.
To export the Inspection to PDF format for printing or filling out via PDF form applications, see Inspections - View/Edit - Export.
To delete the Inspection, see Inspections - Delete.