Inspections - Inspection Items
![]() Updated
Updated
Suggested Prior Reading
Inspection Items
Inspections can be managed in JobPlanner as part of the Field Tools functionality. See Inspections - Overview for more information.
This help pertains to the Inspection Items section of the Inspection.
Inspection Items are setup on the templates. i.e. what item to inspect is and the types of outcome to record for that inspection.
When the Inspection is created, those Inspections Items are setup on the Inspection form and the Inspector will record the Inspection outcomes for each.
Note 1 * This section won't appear during the initial part of the New Inspection process. It will only appear after the Inspection is created (and the form switches to Edit mode).
Note 2 * For existing Inspections, the Inspection must have an Open Status for Inspection Items (or any other Inspection Information) to be changed. If an Inspection has a Submitted or Closed status the information can not be edited, it can only be viewed. See Inspections - Add/Edit/View - Status.
Note 3* All Inspection Items should have an outcome recorded. However, this outcome could be that the Inspection Item is not applicable i.e. the outcome is set as N/A. The reason that an outcome should always be recorded even if N/A is that the Inspection status and outcomes are tracked and if an outcome is not recorded, it looks like the Inspection was not completed.
The following topics are covered in this help:
- Inspection Item Layout
- Inspection Item Navigation
Inspection Item Layout
On the Inspections - View/Edit form, there is the Inspection Items, there will be:
- Sections (with a title)
- Within a section, there will be the individual items to inspect
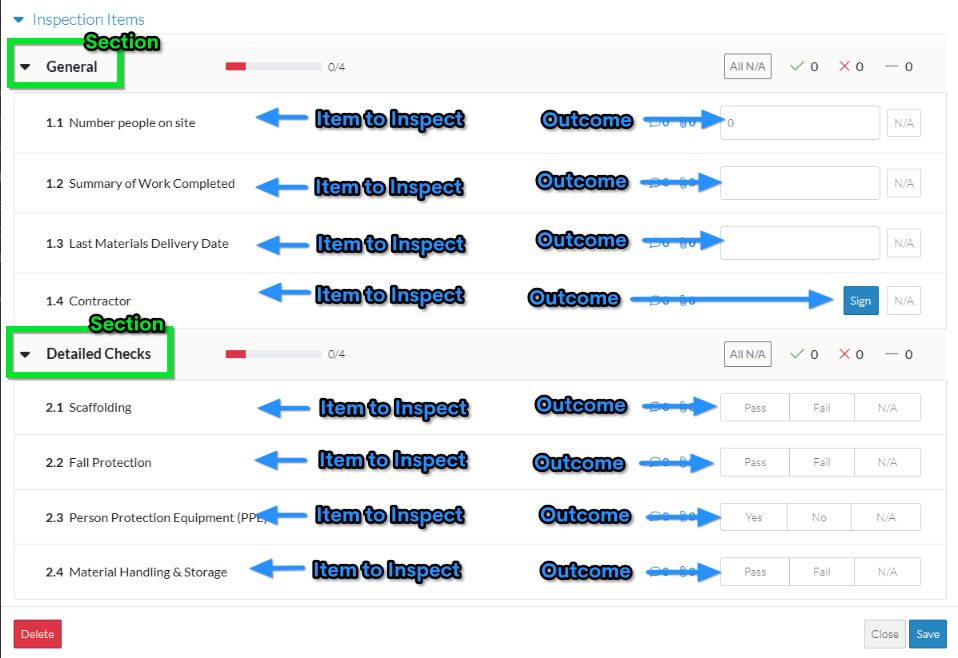
Individual Inspection Items
The following is available for each individual inspection item:
- Record the outcome of the Inspection (pass/fail or yes/no) or inspection information (such as dates, numbers, text or signatures) OR
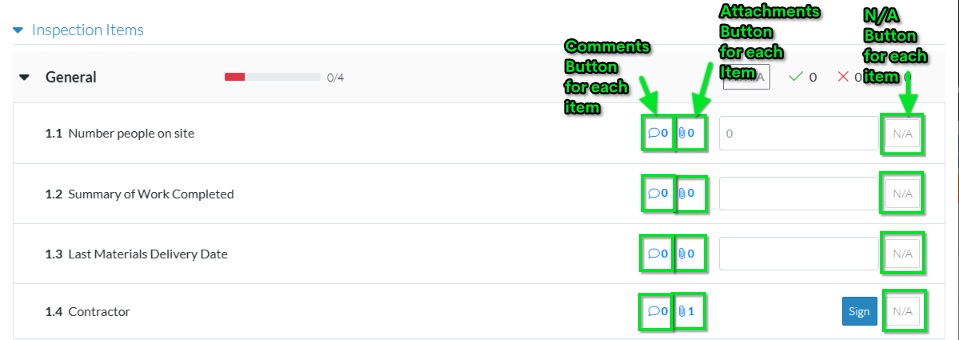
- Set the Inspection Item to N/A (not applicable). There will always be an N/A button for each Inspection Item.
- Enter Comments
- Add Attachments
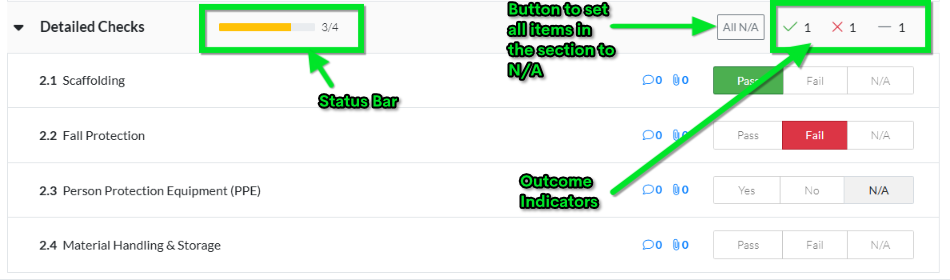
For each Section:
In addition, each Section will have:
- Button to set all items in a section to N/A automatically (instead of setting each individual one)
- Status and tracking of the outcomes of the Inspection for that section:
- Status Bar to show Inspection progression (how far along is the inspection for that section)
- Outcome Indicators - visual indicators to show results of inspections (what are the outcomes of the items inspected for that section
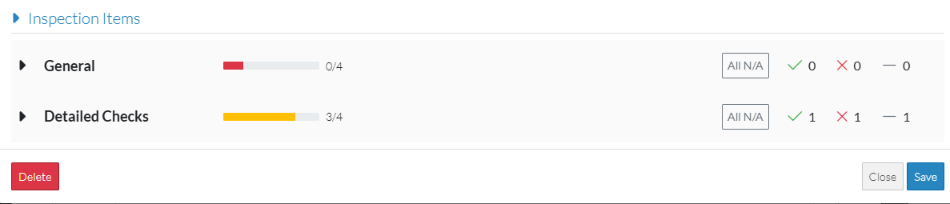
Inspection Item Navigation
If this is a long Inspection form, sections on the form can be expanded and collapsed to show more or less information.
Next Steps
Expand or collapse sections on the Inspection Items for easier navigation, see Inspections - Inspection Items - Collapsing and Expanding.
Record the Inspection Item Outcomes, see Inspections - Inspection Items - Responses.
Enter comments for the Inspection Item, see Inspections - Inspection Items - Comments.
Add and Manage Attachments for the Inspection Item, see Inspections - Inspection Items - Attachments.
View the Status of progression and track outcomes of an Inspection, see Inspections - Inspection Items - Progression Tracking and Outcomes.