Financial Markup - Filter Cost Codes (Sub Jobs On)
Suggested Prior Reading
OR
Filter Cost Codes
Financial Markups can be set to apply to only certain Cost Codes. This can be one Cost Code or multiple Cost Codes.
If Cost Codes are entered in this section, then the Financial Markup is only applied when the Line Item has that Cost Code.
Note* Financial Markups can also be filtered by Cost Types. If Cost Codes and Cost Types are entered, then the Financial Markup is only applied when the Line Item has the Cost Code from this list AND the one of the Cost Types entered. See Financial Markup - Filter Cost Types. However, Cost Types do not have to be entered, just Cost Codes can be entered to filter by.
The examples here are for adding a Financial Markup, but it is the same for editing it as well.
This help pertains to Filter by Cost Codes when Sub Jobs are turned on. To filter by Cost Codes when Sub Jobs are turned off, see Financial Markup - Filter Cost Codes (Sub Jobs Off).
To Filter by Cost Code when Sub Jobs Turned On
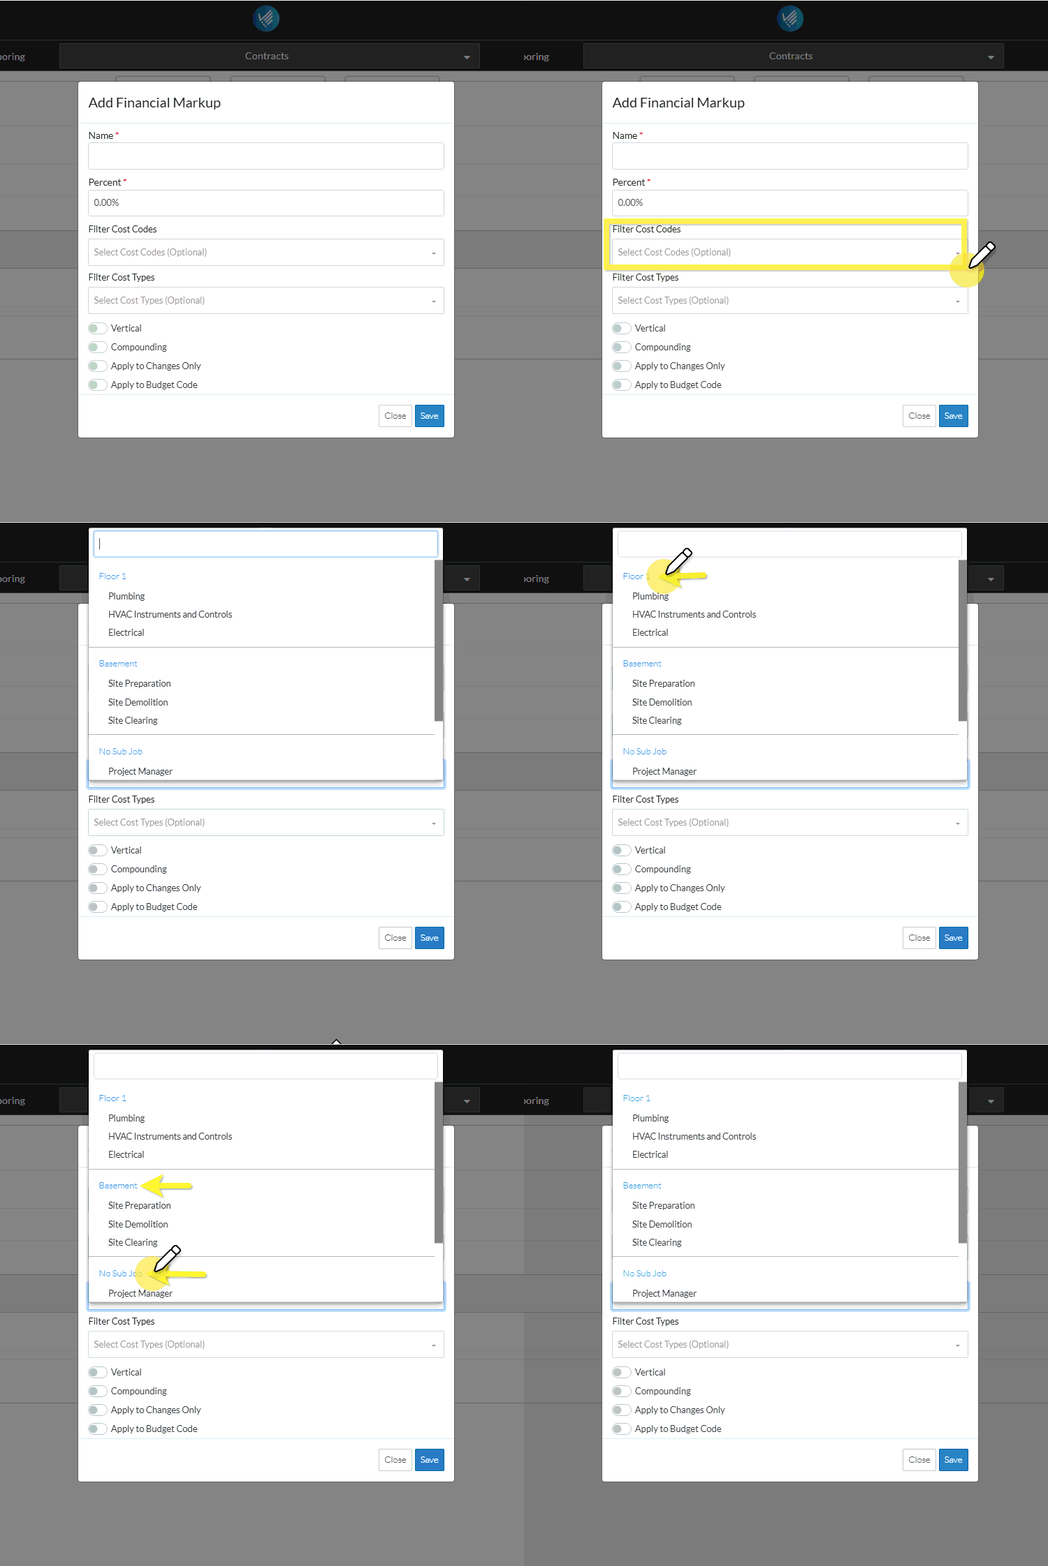
When Sub Jobs are turned on, the Cost Codes in the drop down list are displayed in sections within each Sub Job and also the Parent Job (although this is labelled No Sub Job and appears at the bottom of the list after the Sub Jobs).
- Click in the Filter Cost Codes drop down.

The Cost Codes are displayed in sections by Sub Job first, then Parent Job (under the No Sub Job heading).
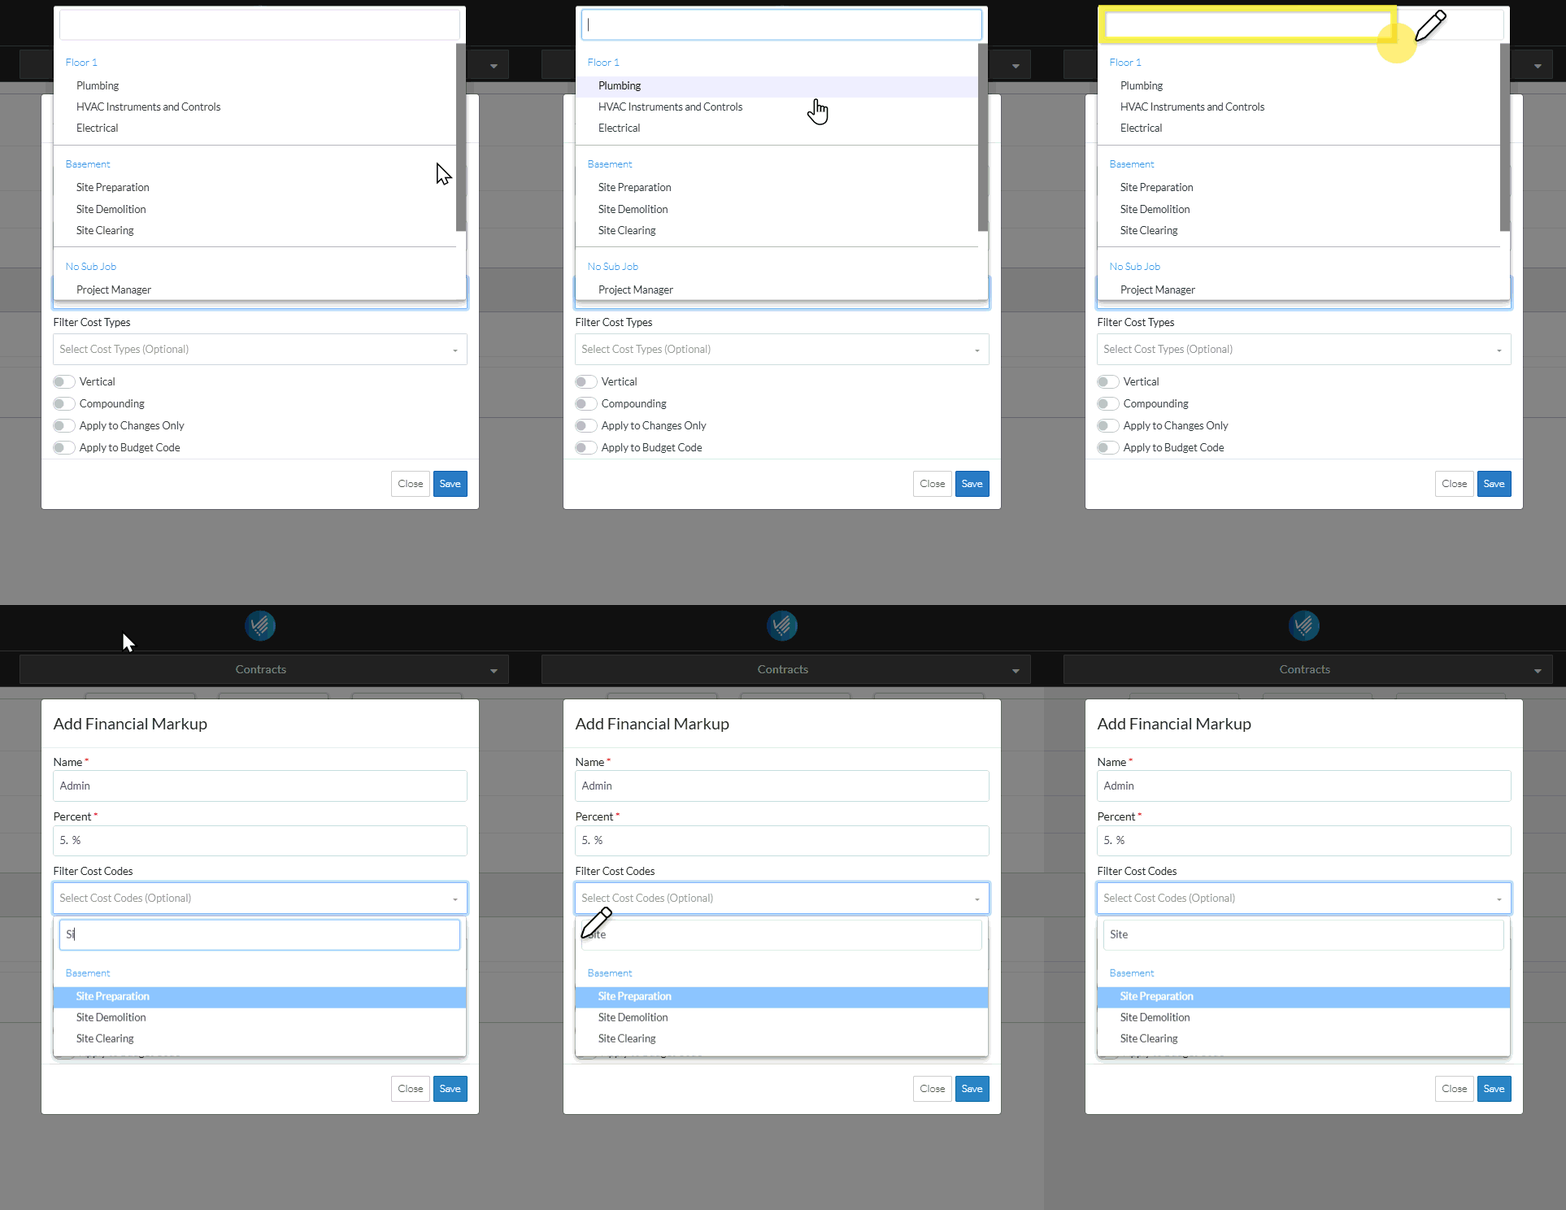
- Scroll through the list to find the Cost Code(s)
and/or
- Type the Cost Code to search for in the search bar at the top of the list.
- As characters are entered in the search bar, the first item in the list that matches what is entered is highlighted blue. Note* For quick selection, the enter key can just be invoked to select the item highlighted in blue if that is the correct one.

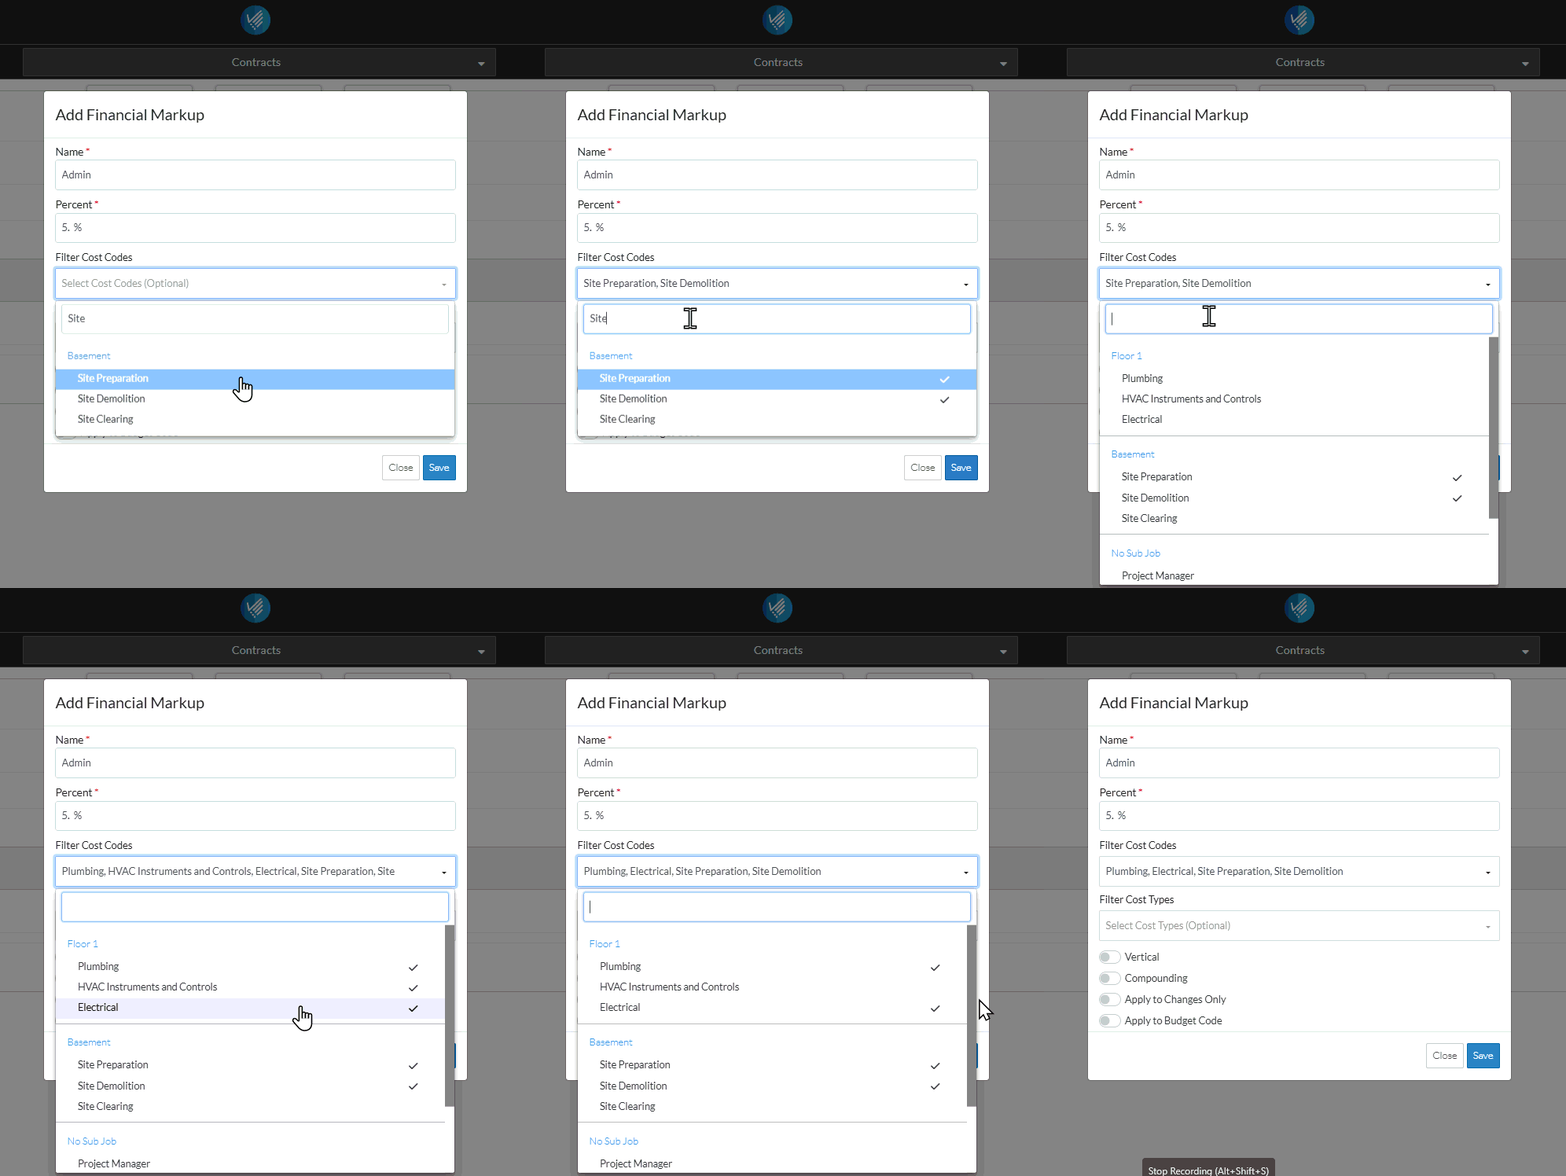
- Click on a Cost Code to select it (before or after search criteria is entered). A check mark displays next to the selection.
- Click on more than one Cost Code if required. A check mark displays next to the selection.
- To remove a Cost Code from being selected, click on it to remove the check mark.
- If required, delete any letters to remove the Search criteria.

- When finished selecting Cost Codes, click any where on the form outside of the drop down list.
The Cost Codes selected appear in the drop down list.
- Make any other changes on the Financial Markup as required, see Financial Markup - Add/Edit/View.
OR
Click the Save  button to save the Financial Markup. The Financial Markup list is displayed. Note* it is not yet saved until the entire item is saved (see below).
OR
Click the Close  button to close the form without saving the information.
Although the Financial Markup is displayed in the list, this is still a working session and the Financial Markup and the entire item is not yet saved.
- Maintain the Financial Markups further as required (see More Information below).
OR
Click the Save  button to save all the information about the Item including the Financial Markup(s).
OR
Click the Save & Email  button to save all the information to save all the information about the Item including the Financial Markup(s) and send an email with a link to the item in JobPlanner. The Item is also added as an attachment in PDF format.
OR
Click the Close  button to close the form without saving the information.
See Financial Markup - Navigation and Layout for more information on the Save, Save & Email and Close buttons.
More Information
Add Financial Markup, see Financial Markup - Add.
Edit Financial Markups, see Financial Markup - Edit.
Set the order the Financial Markups display or are used in Compounding, see Financial Markup - Setting the Order.
Delete a Financial Markup, see Financial Markup - Delete.
Next Steps
View or Maintain the Schedule of Values with Financial Markups, see Schedule of Values - Overview.
Change the other information about the item, see Financial Markup - Where Used for links.
