View/Add/Edit Contacts - Contact Details
![]() Updated
Updated
Suggested Prior Reading
Contacts – Accessing the list of Contacts
View or Edit an Existing Contact
View/Add/Edit Contact - Form Layout
View/Add/Edit Contacts - Company Details
View/Add/Edit Contacts - Contacts (List)
Contact Details
If this is a new Company/Contact being added, this section will be blank and is where you enter the new Contact information.
If there is/are already Contact(s) saved for the Company, this section contains the details about the Contact currently selected in the Contact List (i.e. the Contact with the highlighted blue row).
By default, the Primary Contact is always the one selected (indicated by the blue highlighting and the crown in the first column next to the contact).
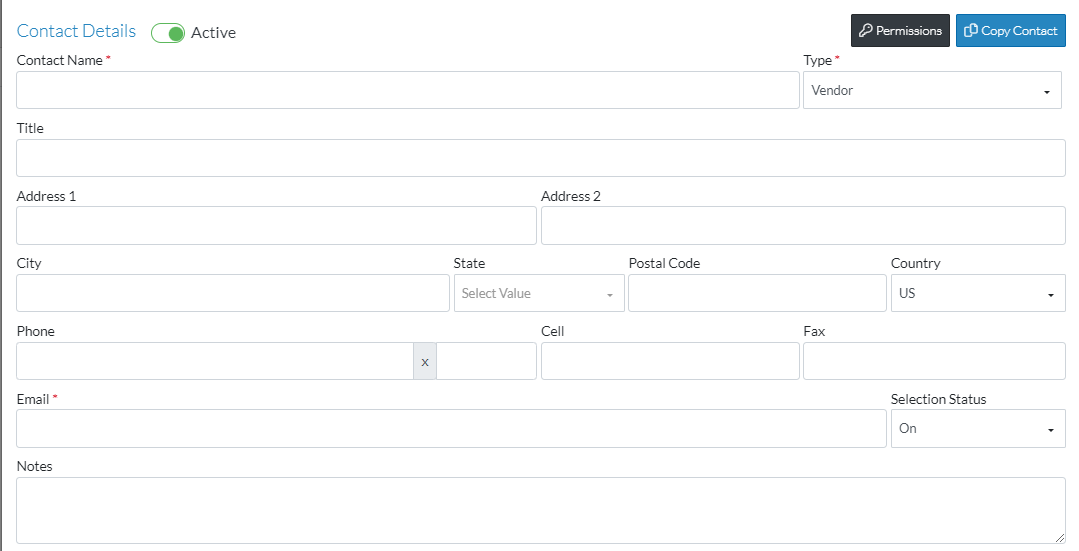
To quickly add a Contact, ensure at least the Contact Name and Email is entered.
Contacts can be set as Active or non Active.If it is set to non active, it will appear in Contacts Lists with a strike thru font. This is just a visual indicator to indicate the company has been set to non active. It can still be selected.
Standard Fields
Name | Description |
Active | A contact can be active or not active. If it is set to non active, it will appear in Contacts Lists with a strike thru font. This is just a visual indicator to indicate the Contact has been set to non active. It can still be selected. |
Permissions (button) | When Contacts are added, they are given a default set of permissions based on the Type assigned to the User. Administrators manage the Types of Contacts and the permissions associated with each Type of Contact. These default Permissions can be overridden however. Click on the Permissions button to do that. Anyone that can edit a contact can change the contacts permissions. |
Set as Primary (button) | This button only appears if the currently selected Contact - the one displayed in this form - is not the Primary Contact already. Click on the Set as Primary button to change the primary contact for the Company to this Contact. |
Copy Contact (button) | The information for the Contact displayed in this section can be copied to a new contact. Not all the information is copied, only the following fields are copied: Address 1 Address 2 City State Postal Code County Phone Cell Fax All the other fields are not copied as they would be specific to an individual (only the common information between individuals is copied) If this is the initial add, and no Contacts have been entered and this button is clicked, a blank contact is copied and the required fields will be highlighted red to indicate they have to be entered. |
Contact Name | The name of the Contact. This is a required field. This is for both the first and last name of the Contact and should be entered First Name first, then last name. |
Type | Click in the drop down to select the Type of Contact. Administrators manage the Types of Contacts and the permissions associated with each Type of Contact. |
Title | Enter the title for the Contact. This is optional. |
Address 1 | Enter the address for the Contact. This is optional. If this Contact is copied to a new one using the Copy Contact function, this field will be copied. |
Address 2 | Enter a second address for the Contact if required. This is optional. If this Contact is copied to a new one using the Copy Contact function, this field will be copied. |
City | Enter the City for the Contact. This is optional. If this Contact is copied to a new one using the Copy Contact function, this field will be copied. |
State | Enter the State or Province for the Contact. This is optional. If this Contact is copied to a new one using the Copy Contact function, this field will be copied. |
Postal Code | Enter the postal code for the Contact. This is optional. If this Contact is copied to a new one using the Copy Contact function, this field will be copied. |
Country | Enter the Country for the Contact. This is optional. If this Contact is copied to a new one using the Copy Contact function, this field will be copied. |
Phone | Enter the land line phone number for the Contact or the company main phone number. This is optional. If this Contact is copied to a new one using the Copy Contact function, this field will be copied. |
Extension | Enter the extension for the Contact. This is optional. |
Cell | Enter the cell for the Contact. This is optional. If this Contact is copied to a new one using the Copy Contact function, this field will be copied. |
Fax | Enter the fax for the Contact. This is optional. If this Contact is copied to a new one using the Copy Contact function, this field will be copied. |
The email for the Contact. This is a required field. | |
Selection Status | In various functions in the system to do with Contacts, there are options to select all Contacts (such as on the Contacts List when doing functions like sending a request for all contacts to update their contact information). This option is used to turn on or off, whether the Contact is included in the select all option. If its ON, then the contact will be automatically selected in a select all contacts function (but the contact can still be individually deselected). If its OFF, then the contact will not be included in the select all contacts function (but the contact can still be individually selected). |
Notes | Notes that can be entered for the Contact. |
Next Steps
See View/Add/Edit Contact - User Details
Save the Company/Contact Details
The Save and Cancel buttons are located at the bottom of the form.
Click on the Save button to save the information this includes updates to Company and Contacts.
OR
Click on the Cancel button to cancel the add or edit of the Company and Contact details.