Settings - Projects - Project Message Status - RSVP
Suggested Prior Reading
Settings - Projects - Project Message Status
Project Message Status - RSVP
The Project Message Status is where the different statuses that can be assigned to the Bidding process are maintained so they can be used to manage the Bidding process (see Bidding - Managing). There are different types of status:
- Status of the Bid (to reflect its stage in the Bidding process). This includes:
- System Predefined Status(es)
- User Defined Statuses
- System Controlled Status (automatically set to reflect activities the Bidding Participant has done).
See Settings - Projects - Project Message Status for more information.
For System Predefined Statuses and User Defined Statuses, there is functionality to change the RSVP setting.
The System Controlled Statuses can't have this changed (Downloaded and Viewed). They are automatically set to to No (as they are automatically system generated).
If the RSVP setting is on, the Bidding Participants can see and can set that status in response to the Bid on the Project Dashboard for the Participant. They appear as action buttons that can be pressed to update the response from the Bidding Participant . If it is turned off, they can not see or set that Status (the Estimator or Project Manager is the only one that can see or set the Status). See Invitation to Bid and Viewing the Bid Response Status on the Dashboard.
RSVP toggle is basically admin only vs all. If it's set to no, only employees can see it which basically turns it into an internal only status. If RSVP is clicked it becomes a choice the invitee can select. Awarded for example isn't something the invitee will ever be able to select only the admin employee can switch it to that status.
Accept and Decline
The Accept and Decline Status are the two main statuses that use the RSVP setting and always have it on by default.
They will appear on the Project Dashboard for the Participant side by side and their order in the list can't be changed.

The Accept and Decline Status can have their RSVP set to off, however this is not recommended to do as there is functionality associated with these and they are the two main responses to an Invitation to Bid.
It is possible that Accept and Decline buttons don't appear on the Dashboard, but show as Yes/No instead, see Project Message - Set the Response Type for more information.
All other Statuses
Besides the System Controlled Status, all the other Statuses including User Defined Statuses can have the RSVP turned on. If the RSVP setting is on, that Status appears as an action button on the Project Dashboard for the Participant (Note* this only occurs if an email was sent with the Response Type of Accept/Decline, they won't appear if the Response type was set to Yes/No, see Project Message - Set the Response Type).
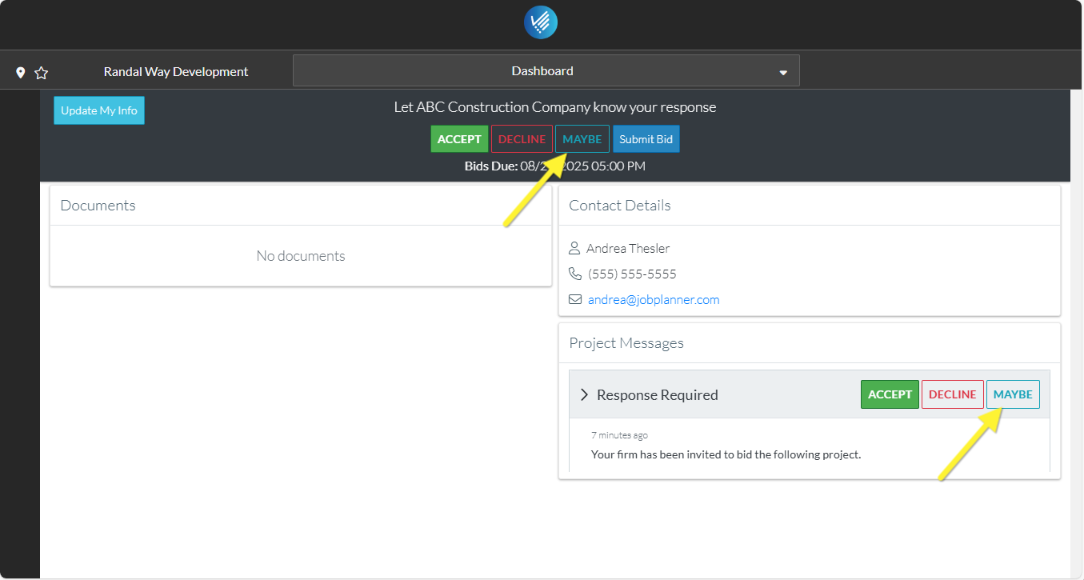
The following is an example of a User Defined Status of Maybe set to RSVP on and the Bidding Participant clicks on Accept or Decline from the Invitation to Bid email.
Note 1 * If other Statuses besides Accept and Decline have the RSVP turned on they will not by default display in the Invitation to Bid email as an action button for the Bidding Participant to click on. They will only appear on the dashboard. To have them display in the Invitation to Bid email, contact JobPlanner for more information.
To change the RSVP setting for a Status:
- Access the Project Message Status settings, see Settings - Projects - Project Message Status - Add/Edit/Delete.
- For the status to change the RSVP setting, click the Edit
 button in the far right column on that row.
 - Scroll to the left or right if required to view the entire table.
- Click on the RSVP slider bar to toggle the RSVP option on/off.
- Click on it again to toggle it.

If it is gray and the circle is to the left it is off

- Change other information about the Status, see Next Steps below.
OR
Click the Save  button on the row to save the changes.
OR
Click the Cancel  button to cancel any changes.
Next Steps
Change the color, see Settings - Projects - Project Message Status - Colors.
Set or change the Activity Score (if required, this is an advanced setting), see Settings - Projects - Project Message Status - Activity Score.
Set the Display Order of Statuses in drop down lists, Settings - Projects - Project Message Status - Display Order.