View/Add/Edit Project Details
![]() Updated
Updated
Suggested Prior Reading
View or Edit an Existing Project
Project Details - Add/Edit/View
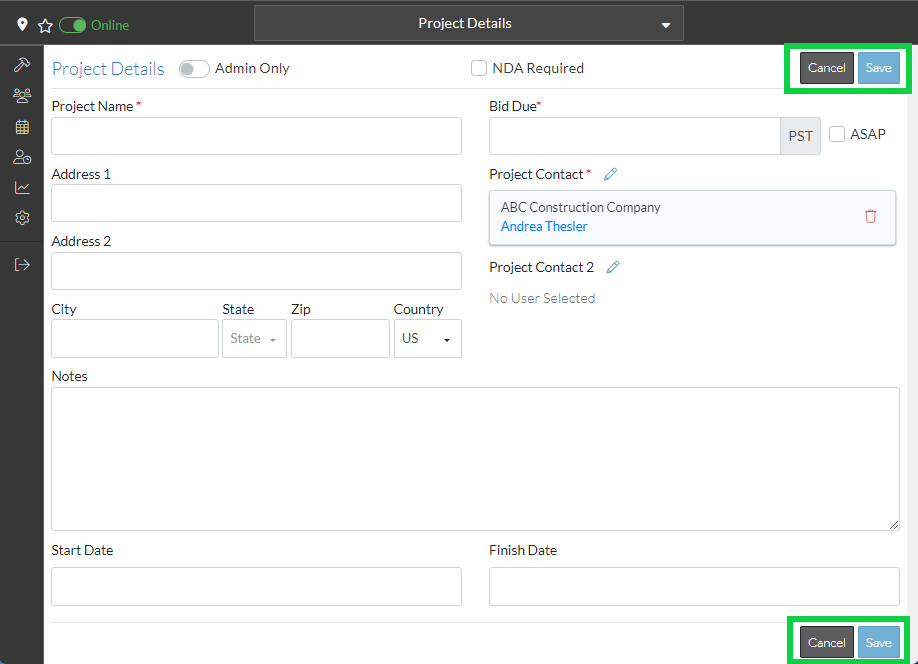
The Project Details form contains all the general details about a Project such as the Project Name, Address and Start and Finish Dates. This form is where the information is added initially but also where it can be edited and/or viewed.

There are a number of predefined Project Detail fields. The Administrator can:
- Hide certain fields (if they are not applicable to the organization).
- Set the labels for certain fields to match terminology used in the organization.
- Set certain fields to be required or not.
- Add custom fields.
Therefore, the Project Detail form may not appear exactly as displayed in the help. The fields that can have their settings modified by the Administrator are explained below.
Any field marked with an astericks is a required field.
Standard Fields
Name | Description |
Project Name | The Project Name. This is a required field. It can be up to 100 characters long. |
Address 1 | The address for the project job site. |
Address 2 | A second line to enter address information if required. |
City | The name of the city where the project job site is. |
State | The name of the city where the project job site is. Note* By default the Country is set to US. This is a drop down list and will show the States or the Provinces for the Country selected. If necessary, select the Country first before selecting the State. See Project Country and State for more details. Click on the State field and select the State or Province from the drop down list to add it or change it. 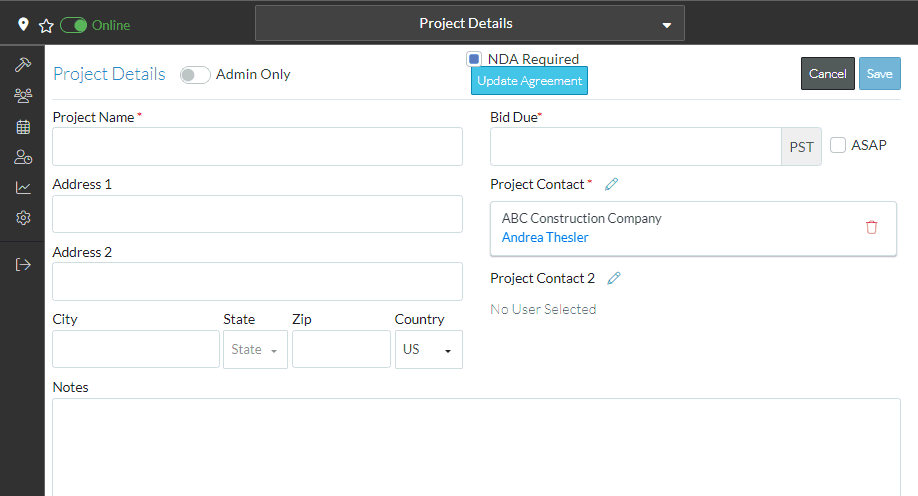 |
Zip | The zip code for the project job site. The zip will auto fill when searching for subcontractors on a project based on the project zip if you have it filled out. Also the Google map location uses the zip to show the project location. The format of the information entered in the Zip code will be set based on the country. Note* The Administrator can set this as required or not. |
Country | The Country where the project job site is. This is by default set to US. This is a drop down list. The Country selected here will dictate what information displays in the drop down for the State. See Project Country and State for more details. Click on the Country field and select the Country from the drop down list. 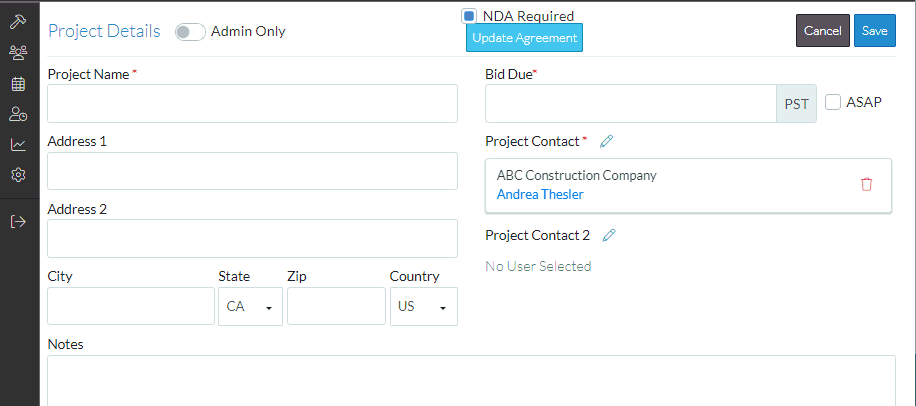 |
Bid Due | This the date/time responses to bids are due. This date is used to communicate to the subcontractor. It will show in their view and is used to fill out dates in different email communications. It's also used in different reports and items to show project by bid due date. Note* The Administrator can change the label for this field. "Bid Due" is the default label, but it may appear with a different label specific to the organization. The Administrator can also set this to required or not. Click in the Bid Due field to enter or change it (Note* If ASAP is turned on - see below - the Bid Due is greyed out). A date and a Time for the Bid Due can be entered. If a Time is not specifically set, it is set to the Default Bid Due Time that is setup by the Administrator, but can be changed if required. See Project Bid Due and ASAP for more information. |
ASAP | This is used to set the Bids Due to "As Soon As Possible". instead of entering a Date/Time. Click on the setting to toggle it on/off. If it is turned on, the Bid Due field becomes greyed out and can not be edited. This date is used to communicate to the subcontractor. It will show in their view and can appear on different email communications and reports and items to show project by bid due date. The recommended practice is not to use ASAP because it is not a date and won't be included in some reporting and other functions that search for a date. Instead it is recommended to enter a date and time. See Project Bid Due and ASAP for more information. |
Project Contact | The main contact for the Project. It is mostly used to auto-populate emails with a contact. Note* The Administrator can change the label for this field. "Project Contact" is the default label, but it may appear with a different label specific to the organization. This is a required field. This defaults to the user that created the project but can be changed. See Adding/Editing Project Contacts. |
Project Contact 2 | This is the secondary or alternate contact for the Project. See Adding/Editing Project Contacts. Note* The Administrator can also turn off display of this field (if its not generally used or needed). If displayed, the Administrator can also change the label for this field. "Project Contact" is the default label, but it may appear with a different label specific to the organization. The Administrator can also set the field as required or optional. |
Notes | Notes for the Project. Note* The Administrator can change the label for this field. "Notes" is the default label, but it may appear with a different label specific to the organization. The Administrator can also set the field as required or optional (for example, if it was used to record information that is always required for a project). |
Start Date | The projected or actual Project Start Date. See Entering Dates for more information. |
Finish Date | The projected or actual Finish Date. See Entering Dates for more information. |
Admin Only | This option is used to hide the Project Details form from non admin or guest users of the system (aka subcontractors) or basically anyone not in the Company. This appears at the top of the Project Details form. Click on the setting to toggle it on/off. 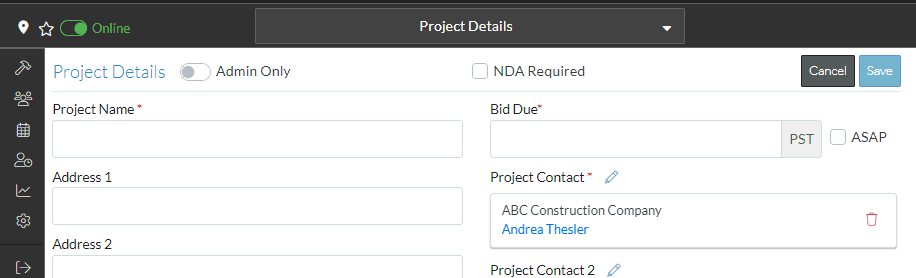 |
NDA Required | Setting to specify whether a non-disclosure agreement is required or not and also to bring up the Update Non-Disclosure Agreement form. If this is enabled a subcontractor or guest user will have to sign the NDA before they get access to the project. This appears at the top of the Project Details form. The Administrator can set this field as required or not and it will differently depending on that setting. See Non-Disclosure Agreement for more information on the different ways it may appear and how to enter, view or update the Non-Disclosure Agreement.  |
Custom Fields
In this section, at the bottom of the standard fields, any custom fields created for the Project Details are displayed and can be entered or maintained.
Projects List - Columns and Searching
All of the fields, except Notes can be displayed as columns on the Projects List and can be searched. Custom Fields can be shown as columns and if they are, they can be searched. See Project List - Settings for more information.
Save the Project Details
The Save and Cancel buttons are located at both the top and bottom of the Project Details form for ease of access.
Click on either Save button to save the information.
OR
Click on either Cancel button to cancel the add or edit of the Project Details.
Note* Ensure the information is saved before going to a different menu option or a different project form, otherwise, the information will not be saved.
See Also
Set the Project Location on a map