Bids - Accepted
![]() Updated
Updated
Suggested Prior Reading
Bidding Messaging List - Accessing
Bidding Messaging List - Overview
Bids Accepted
Bidding Participants that receive Invitation to Bids can Accept the Bid directly from the Invitation to Bid email which opens JobPlanner and automatically sets the status to Accept.
Estimators or Project Managers can also manually set the Status to Accept if the information is received outside of JobPlanner.
Both topics are covered below.
Bidding Participants Accepting Bids
For the process for Bidding Participants to accepts Bids, see Accept Invitation to Bid. (They can also decline the Bid, see Decline Invitation to Bid).
Once a Bid is accepted via email and JobPlanner by the Bid participant the Status of the Bid is automatically set to Accepted.
Estimators or Project Managers manually update Bids Acceptance
Although it is recommended to have Bid Participants accept their bid through the system, in some cases it may be received in other forms such as email. In that case, the Estimator or Project Manager can manually update the Bid Received details:
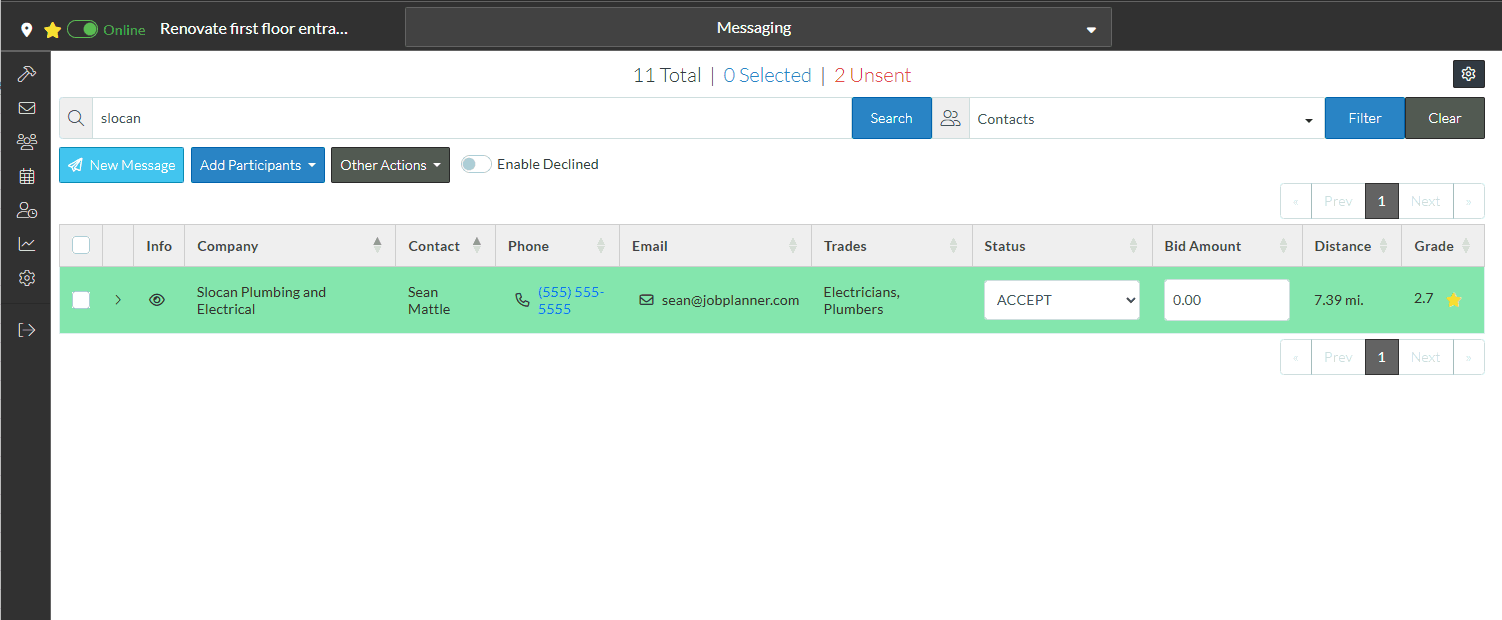
- Access the Bidding Messaging List, see Bidding Messaging List - Accessing.
- Find the Contact/Company that has accepted the Bid.
- Set the view to use, See Bidding Messaging List – View. See Bidding Managing – Bid Response - Status and Bid Amounts for more information on which view to set. In the example below, the view is set to Contacts.
- Search and/or filter the information as required. See Bidding Messaging List - Search and Filter. In the example below, the company name is searched for.
- Scroll through the Bidding List as required to find the Company/Contact. See Page Navigation.
- Click in the Status column and set the Status to Accept.
Depending on what row type the Status is updated on (see Bidding Managing – Bid Response - Status and Bid Amounts for more information). Additional messages may appear. In the above example, the Status is changed on the Contact row but there are two Trades for the Contact so a message appears asking if the Status for all Trades are to be updated or not.
If the Yes Button is clicked, all Trades for that Contact are updated with the Status (this is outlined in the example above). See Bidding Messaging - Status for more details on the update and the display.
If the No Button is clicked, the update is cancelled (no Trades Status are Updated). The status for each individual Trade can then be updated.
- Click on a Contact to expand out that section and see all Trades (see Bidding Messaging List – Groups - Expanding and Collapsing).
- Click in the Status column and set the Status. See Bidding Messaging - Status for more details on the update and the display.
More Information
To view additional details about the Bidding Participant, such as if they downloaded documents and when, see Bid Status - Information.
To View the Accepted Bids, see Reviewing Accepted Bids.